This windshield wiper prop is taken from instructions found on the Monster list of Halloween Projects and wasoriginally created by Dave Raulerson'sAnimated Crawling Skeleton - Unfortunately his site has been closed, but hopefully he will be back up and running soon. Keep an eye on the Monster List of Projects. Keep in mind, the Crawly Guy is low to the ground so it tends to surprise most ToTers, good placement is important.
Additional information on using windshield wipers to animate props can be found at www.scary-terry.com.
As with all projects, proper tool safety is needed. Be sure to read and follow all manufacturer warnings and instructions on use. Always wear safety goggles.
Supplies (3)1"x 1/8" 6 foot length aluminum flat stock
(1)4" x 6" post base uplift (to mount over motor)
(1)6 foot 1 ½" foam pipe insulation
(1)pair work gloves or skeleton hands
(1)old shirt or suit
(1)full size skull head
(1)Windshield wiper motor (MonsterGuts.com)
Scrap Wood
Drill
Metal Saw
Machine bolts & nuts
Nylon washers to fit bolts
Wood Screws
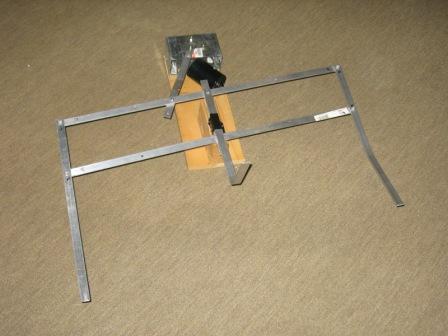
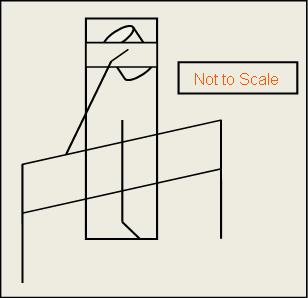
The Mechanism
The basic mechanism shape will be a "box" that pivots from a central attachment as the crank on the windshield motor rotates.
Cut the aluminum stock into (2) 30 inch, (2) 18 inch, (1) 16 inch, & (2) 12 inch pieces. Save any scrap for adjustments and shims.
Drill holes for the machine screws ½" in from each end of the 30" lengths and on one end of each 18" length and the 16" length.
Drill holes in the center of both 30 inch lengths, and one hole 4 inches off of center in one 30' length.
Drill holes 6 inches in from the holes drilled in the 18" lengths and the 16" length (Important- you may want to wait until the box is assembled to drill the 16" holes).
Bend the un-drilled end of the 16" length at 5 or 6 inches from the end to form a "neck".
Drill holes in one 12" length, 1 inch from one end, and 2 inches from the other end.
To assemble the "box", attach the two 18" sides to the two 30" lengths using the machine bolts and nuts. Place a nylon washer between the aluminum pieces to reduce friction.
Temporarily attach the 16" neck through the center drilled holes in each 30 inch length adding more washers (mark and drill the 16 in piece now if you waited). This is the piece attached to the base and will serve as the pivot points.