Getting to Know Windows 10, Fall Creator’s Edition
By Wayne Maruna
This article is written as an aid for people coming to Windows 10 from an earlier version of Windows. It is not intended to go into great depth; there are Win10 books written for that purpose. The intent here is just to get the reader started. This also assumes that the computer has already been properly set up.
Once the computer has been powered on, after the initial boot process, the machine will typically display what is known as the Lock Screen. There are no visible indicators of what to do here. But merely press a keyboard key or a mouse button and you will be taken to the Log-In Screen, which will display the user name and await entry of a password or PIN (personal identification number). Once a password is entered, press the Enter key to go to your desktop. If a PIN is entered instead, Windows does not require you to press the Enter key; you will be taken to the desktop as soon as you have entered the last of the PIN numbers. If a password has been set up but a PIN has not, and the user wishes to employ a PIN to log on, they can create the PIN later using the Settings (gear) icon, and go to Accounts.
If the machine has been set up without a password, it may bypass the Lock Screen and Log-in screen and go directly to the desktop.
The bottom of the desktop displays a black bar with icons on it. This is called the Taskbar. At the far lower left of the taskbar is the Start Button, which looks like a four-pane window. At the far right of the taskbar is your system clock with time and date, and a square notification icon to the right of that. Other icons may appear here as well, such as speaker volume, Internet Connection, and any of several others controlled through Taskbar Settings.
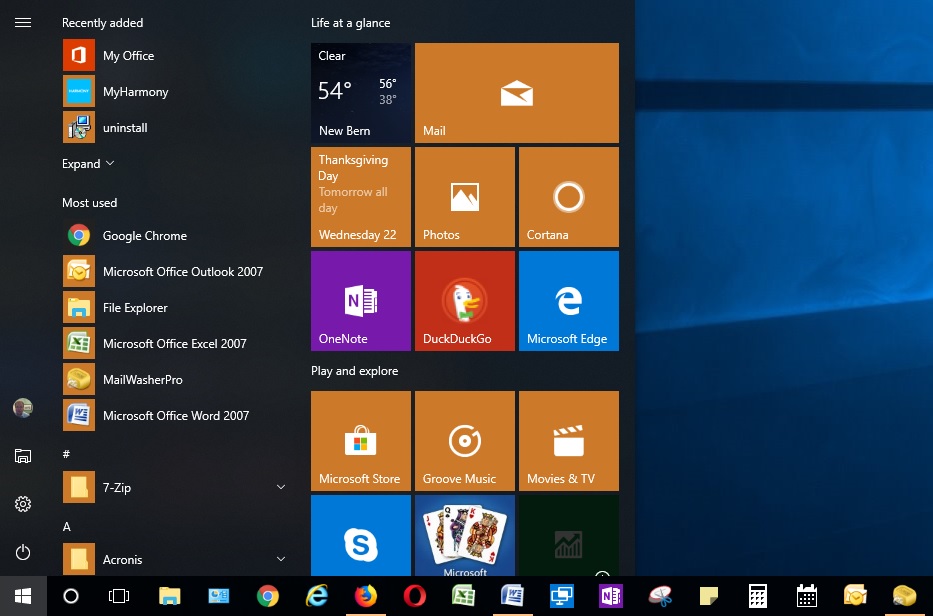
Below is a picture of a Windows desktop once the user has left-clicked on the Start Button. The picture has been cropped to focus on only the left half of the taskbar.
Above the Start Button are four icons arrayed vertically. Stating from the bottom and going up, the first is the Power button. Click that and you will see options to shut down, restart, or put the computer into Sleep Mode. Above the power icon is the Settings button. Clicking this will take you to a Settings screen, which is where you can modify the behavior of your computer in several areas. This will be covered later. The third icon, which you may or may not see, is the File Explorer button. Clicking this is the same as clicking the manila folder icon on the task bar (third to the right of the Start Button above.) The fourth vertical icon shows the User ID. If you have gone into Settings and added a photo to your user ID, you will see a photo icon; otherwise it will appear blank. If the machine has been set up with multiple users, you can click on the User icon to log out or switch users.
To the right of the four vertical icons is the program menu. Here you may see a list of recently added programs, followed by a list of frequently used programs, and then an alphabetic list of all installed programs. There is a scroll bar to the right of this which you can use with your mouse to scroll the contents of your program list. Clicking on a program entry will open the program.
To the right of the program list is a Start Menu which displays applications in a tiled format. Items in the program list can be added to the group of program tiles by right clicking a program in the list and choosing to ‘Pin to Start’. You can remove items from the tiles by right-clicking a tile and choosing ‘Unpin from Start’. Items in the tiled Start menu can be re-arranged by clicking on a tile and holding down the mouse button while dragging the tile to another position. Clicking on a tile will open the program. Please note that every tile has a like entry in the program menu. Deleting a tile from the start menu does not affect it program menu listing unless you choose to uninstall the program.
Let’s look now at the taskbar, which displays a series of icons to the right of the Start Button. Which icons appear, and in what order they appear, will vary by machine and how the user wishes to order and display them. The above picture is fairly representative and is shown as an example only. Hovering your mouse over an icon will display its textual name. You can click and hold down the mouse button to drag an icon to change its displayed order. You can also right click it and choose to delete the icon (not the program) if you wish.
Immediately to the right of the Start Button above is the Cortana Search icon. In its default state, Windows displays this as a large rectangular box that says ‘type here to search’. This box takes up a lot of precious taskbar real estate, so I choose to right click it and go up to ‘Cortana’ and choose ‘Show Cortana Icon’ which reduces the big rectangle to a white-on-black circle. To use Cortana, simply click on the circle and enter your search criteria in the field. Cortana Search is probably the first place to go if you want to find certain functions in Windows. For example, you can enter ‘Mouse’ or ‘Printers’ or ‘PIN’ and be pointed in the right direction.
Next to the Cortana icon is Task View which allows you to set up and move between different desktops. Frankly, I don’t know anyone who uses this.
On my machine, I choose to display the File Explorer icon (manila folder) next to Task View. You will use File Explorer a lot, as it allows you to get quick access to your Documents, Downloads, Music, Pictures, and Video folders, as well as any installed drives, including flash drives.
Next to File Explorer, I like to have my Control Panel icon. Along with Settings discussed earlier, the Control Panel allows access to change various settings on your machine. This is where you can control Printers, Mice, Power Settings, and many more settings. The Control Panel is not included in the taskbar in the default setup of Windows. You can add it by going to the Programs list, scrolling down to Windows System and opening that, and right clicking on Control Panel and choosing ‘Pin to Taskbar’.
After Control Panel, I like to show my web browser icons. The default for Windows 10 is Microsoft Edge, but I don’t like it, so you won’t see its dark blue ‘e’ icon shown in my taskbar. Instead, you will find icons for Google Chrome, Internet Explorer, Mozilla Firefox, and Opera. You may choose to only show one or two web browser icons. Shown after that, left to right, are icons for: Microsoft Excel, Microsoft Word, Quick Assist, One Note, Snipping Tool, Sticky Notes, Calculator, Calendar, Microsoft Outlook, and Mail Washer Pro. I put all these icons on the Taskbar. The reader should add any programs they intend to use frequently, as these icons provide one-click access.
There are two icons not displayed above which are included in the Win10 default. One is a four-pane shopping bag with a handle; this will take you to the Microsoft Store where you can find both free and paid-for applications. The other is an envelope icon which will take the user to the Mail app. It should be noted that Windows Live Mail is no longer supported and cannot be installed on Windows 10. The new Mail app is Win10’s default email app. I use Microsoft Outlook which is part of Microsoft Office. Mozilla Thunderbird is a viable alternative email program.
Turning on the computer is done by a mechanical button on the unit, but turning it off should be done by clicking on the Start Button, then the Power icon, and then choosing Shut Down.
Controlling How Windows 10 Looks and Works
The user has some control over the appearance and functionality of Windows 10. This can be done using a combination of the new Settings app and the familiar Control Panel.
Settings App
If you press the Settings (gear) icon in the vertical icon stack above, it will take you to a screen similar to the following:
You will find yourself using the Settings options a good deal. It is beyond the scope of this Win10 intro to go into depth in this area, but the reader should become familiar with what is offered here. I encourage the user to click around here to explorer what can be done. Noteworthy settings include:
Personalization – change your screen saver and Lock Screen here under the Lock Screen section.
Apps – change your default apps under the Defaults sub-section. Clicking on a default app will bring up a list of alternates.
Accounts – you can change your password, PIN, add a photo to your user ID, and add other computer users here.
Privacy – review your privacy settings here, as the Microsoft defaults take some liberties.
Update and Security – you may use this one the most. Windows 10 updates tend to happen automatically, but you can search for updates here, and if you are using Windows Defender for your Anti-Virus, you can check settings and status here.
Control Panel
The Control Panel is largely unchanged from earlier versions of Windows. Perhaps the biggest change is moving the Screen Saver settings out of Control Panel and into the Settings app (under Personalization > Lock Screen). The sections of Control Panel I use the most are Programs > Uninstall a program, and Hardware and Sound > View Devices and Printers.
File Explorer
You will make frequent use of File Explorer. You get to File Explorer by clicking the manila folder icon on the task bar, and you can also select it from within the Programs list under Windows System. File Explorer is where you can get access to your file folders, such as documents, music, and pictures. A snapshot of my File Explorer appears below. Double clicking any folder will reveal the files contained within.
By double clicking on ‘Drive_C (C:) – yours will have a different name – you can see the folder content of the C-Drive, which is generally where your programs, data files, and Windows installation files are stored. One of the folders is called “Users”. If you double-click that, you will see a list of User accounts. And double clicking a User account will reveal their Documents, Downloads, Music, Pictures, and Video folders. Many of these will also be displayed at the top left of File Explorer under “Quick Access”.
Where to go from here
Familiarizing yourself with the above areas will go a long way toward navigating Windows 10 comfortably. Note that we have not even discussed programs/applications, which are what the user is most interested in working with. We have not even scratched the surface of how to use Windows. This article was intended to just familiarize the user with the basic layout of the operating system so they could start using their computer with at least some confidence. I suggest a visit to your local bookstore where you can peruse the technology aisle and hopefully find a book with lots of graphics to help learn as much as you care to learn. A carefully crafted search term entered into a web browser’s search engine can also open up the entire World Wide Web to your quest for further understanding of the Windows operating system.
Every web browser, be it Microsoft Edge, Internet Explorer, Google Chrome, Mozilla Firefox, or any other, will have a default search engine. For example, Edge and I.E. default to Microsoft’s Bing, which is Microsoft’s search engine. Google Chrome uses Google – no surprise there. Some people prefer Yahoo, while I prefer DuckDuckGo because its authors say they do not track you on the web. Entering a carefully crafted search term or phrase into a web browser can find countless ‘hits’ or relevant sites.
The website www.youtube.com is another treasure trove of how-tos with the benefit of video presentation. You can find how-to videos on anything from how to run popular computer applications to how to tear into a laptop’s innards.
And finally, a personal plug. I’ve been writing computer related articles for the local community newspaper since 2004, and I’ve posted most of these on my own website, http://pages.suddenlink.net/wamaruna/tribune.html . The articles are in date order within the four broad categories of Hardware, Software, How-Tos, and General Interest. This article appears as the December, 2017 entry under How-Tos.