
PLANTING HINTS FOR NATIVE PLANTS![]()
![]()
Motivation
![]() Why Natives
Why Natives
![]() Garden Goals
Garden Goals
Site Preparation
![]() Site Analysis
Site Analysis
![]() Site Plan
Site Plan
![]() Hardscapes
Hardscapes
Plant Selection
![]() Which Native
Which Native
![]() Planting Hints
Planting Hints
![]() Suggested Plants
Suggested Plants
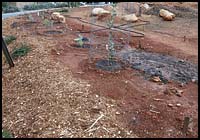
Young plants look skimpy when planted with adequate space for their mature size.
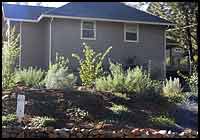
Two years later, the plants have begun to fill in the empty space.
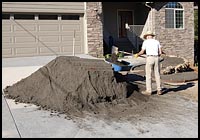
If you have a large amount of mulch delivered, most companies waive the delivery fee.
Patience
Patience may be the prime planting requirement.
When you first put the plants in place, you may not think there are enough of them. Be assured that they will grow to fill the space that you have allowed. If for some reason they don't get as big as you expected, you can always add plants later. You can temporarily fill in between your plants with annuals or small understory plants.
You do not need to start with large plants. Small plants in 2-inch, 4-inch or one-gallon sizes will catch up quickly and often surpass the plants that were larger in the beginning.
There may be slow growth during the first year a plant is in the ground. There will be a rapid increase in size the second year when the roots are well established, the drainage is good and the plant is happy in its location.
Planting Hints
The Time to Plant
The best time for planting native plants is late fall or early spring. Fall planting is preferred because it allows the plant to establish root growth in the still-warm soil before putting on more top growth in the spring. Very early spring planting is next best, allowing the plant to settle in before the heat of summer. Some experts say you can plant any time of the year if you watch the watering carefully, but summer planting is not advised in the foothills.
Soil Preparation
You may be given guidelines for planting native plants wherever you buy the plants. Since foothill soils often lack phosphorus and calcium, it is often suggested that you add rock phosphate and oyster shell. Not everyone does. Do not add fertilizer or a planting mix.
Master Gardeners advise putting mulch on top of the soil to add organic matter instead of mixing it in. The reason is that native plants are adapted to native soil and adding a planting mix may set up conditions that will lead to root rot from the retention of too much moisture. Also, adding amendments and fertilizer may promote lush growth and ultimately lead to the early demise of the plant. A rich amendment in the planting hole may also discourage the roots from growing outward into unamended soil. This creates a problem because plants need to grow outward for stability and to gather the limited moisture in a less-watered environment.
In spite of knowing the general rule of avoiding amendments, some gardeners with dense clay soil experiment with incorporating a small amount of mulch, no more than one part mulch to three parts native soil. Because the plant will be in the ground long after the organic material breaks down, this amount of mulch will likely have a short-lived effect and probably not be detrimental. It is simpler to just add mulch on the surface.
Plant Relationships
Deciding how close to put the plants is important. Allow for future growth, for some plants will be bigger at maturity than you can easily imagine when they are in a 1-gallon container or 4-inch pot.
Try to visualize how one plant will blend with the others in its vicinity. Think about foliage size, texture and color in addition to flower size and color. If fragrance is involved, place the plant where visitors can appreciate it.
The Planting Hole
When getting ready to plant, dig the hole twice the width of the container and only as deep as needed to place the plant at the same level it is in the container. A square or irregular shaped hole, instead of a round hole, will encourage roots to grow outward. Roughen the sides of the hole with a hand tool or your shovel. Especially in clay soil, the sides of the hole may be very slick and difficult for roots to penetrate. Check the depth of the hole by setting the container in the hole or measure the height of the soil in the container. Adjust the depth if necessary.
Add several inches of water or fill the hole if the soil is dry. Let the water soak in.
Add the desired amount of phosphate in the bottom of the hole and cover it with an inch or so of soil. Phosphate does not travel through soil, so it needs to be in place to be available to the growing roots. The added soil on top of the phosphate should allow the plant to end up about one inch above the surrounding soil, with the soil sloping upward to the stem of the plant. As the dirt settles, the plant will end up at the same level of the garden soil. It is important that native plants do not end up in a depression where water will collect and possibly cause root rot. On the other hand, clay soil may not settle as much as expected, and the rootball may be exposed to the air. You will need to check in a couple of days to see if the plant is high and dry. Place more dirt around the rootball if necessary. Many plants do better on a slight mound, so it is better to err on the side of planting high, just as long as you do not let the rootball dry out before the roots are established in the native soil.
Gently remove the plant from the container by supporting the top of the soil with an open palm as you turn the container upside-down and hit the bottom of the container with the heel of your other hand. If the plant doesn’t come out, set the container on its side on the ground and press down on the side as you roll it a bit. Another trick is to tap the rim of the upside-down container on a large rock or a wall, still supporting the soil and plant with your open palm. Never pull on the plant itself in an attempt to get it out.
The Rootball
The next step is to inspect the rootball. For years we were told to loosen the mass of roots gently or to even make a couple of vertical slashes, but recent tests have shown that plants grow just as well, if not better, if the roots are not loosened. Use your own judgment in applying this modified advice, especially if the roots appear to be in a hard mass or circling around the rootball.
Adding Soil and Water
If you are adding oyster shell for calcium, mix it with the soil you will be placing in the hole, unless it has been previously added to the garden soil. Place the plant in the hole and fill in half of the dirt, firming it around the roots. Add water and finish filling in the dirt. In red clay you may prefer to fill in all the soil before watering, for the clay gets very squishy when watered.
The soil will slope up towards the plant, covering the vertical sides of the rootball, which should be about an inch above the surrounding surface.
Water the plant in with adequate water to reach the lower roots and settle the dirt. Inspect the soil level to be sure that the sides of the rootball are not exposed.
You may want to form an outer wall or ring to keep water from running off if you are expecting warm weather. You don't want a basin during the winter months when rains make the ground soggy.
Future Watering
The new plant needs water during its first two years even if it is labeled drought-resistant. Install driplines when you plant if you are watering with that method. Some gardeners prefer inline emitters and also use mini-spray heads, depending upon the plants to be watered. Soaker hoses can be used, but they tend to clog up after a while.
Check the plant regularly to be sure it does not dry out. Because the soil that was in the container may lose moisture more quickly than native soil, you need to check in the rootball zone close to the stem. Plants can actually dehydrate and die when we think that the ground is plenty moist.
Mulching
Add mulch to the surface of the ground, but keep it back 2 to 3 inches from the stem of the plant in order to avoid fungi and rot.
Mulch may be small woodchips, pine needles, compost or whatever you prefer to use.
Fertilizing
You do not need to fertilize the plant. In fact, adding fertilizer may stimulate excessive growth and the plant actually dies at a younger age than is normal.