Building
Flying
Building/Flying/Engine
Techniques
Pattern Home Page | Rudder
Control | Max Points in Novice | Contests/Results
| Glasses | Fuel Facts | Links
![]()
![]()
Building Techniques
![]() Installing a
Violett Hatch Mount: Always install the mechanism with
the spring and pin on the fuselage and the female receptacle on the canopy.
Reason: the pin won't damage the finish when you repeatedly install the canopy.
Don Ramsey
Installing a
Violett Hatch Mount: Always install the mechanism with
the spring and pin on the fuselage and the female receptacle on the canopy.
Reason: the pin won't damage the finish when you repeatedly install the canopy.
Don Ramsey
![]() Honeycombing - When honeycombing a
wing always provide an escape for the air trapped in the honeycombing. Use small
holes and vent to some outside area, the wheel well, the wing root area, etc. This
will keep the air in these holes from expanding and contracting when in the weather.
Mike Harrison
Honeycombing - When honeycombing a
wing always provide an escape for the air trapped in the honeycombing. Use small
holes and vent to some outside area, the wheel well, the wing root area, etc. This
will keep the air in these holes from expanding and contracting when in the weather.
Mike Harrison
![]() 6-32 Control Horns - Foolproof and
durable control surface control horns. I use 6-32 x 2" Stainless steel phillips head
screws. Counter sink into a hardwood dowel epoxied in the control surface. On the Bottom,
reverse a blind nut, attach and tighten with loctite, grind off the tangs. Use the
Goldberg nylon connectors - they screw on great, easily replaced, and stay put. The
"trick" in this is the drilling of the hardwood. I drill the screw hole in the
dowel BEFORE beveling the leading edge. That way, you can "square" the leading
edge to a 90 deg block, then just drill a vertical hole...if you use the same block and a
drill press, all the holes will ALWAYS be perpendicular to the center line of the
airfoil.a necessity for symmetrical throws..... Bob Pastorello
6-32 Control Horns - Foolproof and
durable control surface control horns. I use 6-32 x 2" Stainless steel phillips head
screws. Counter sink into a hardwood dowel epoxied in the control surface. On the Bottom,
reverse a blind nut, attach and tighten with loctite, grind off the tangs. Use the
Goldberg nylon connectors - they screw on great, easily replaced, and stay put. The
"trick" in this is the drilling of the hardwood. I drill the screw hole in the
dowel BEFORE beveling the leading edge. That way, you can "square" the leading
edge to a 90 deg block, then just drill a vertical hole...if you use the same block and a
drill press, all the holes will ALWAYS be perpendicular to the center line of the
airfoil.a necessity for symmetrical throws..... Bob Pastorello
I also use 6-32 Stainless steel screws. But, I pick up some nylon inserts from my local Home Improvement chain. These inserts come threaded or non-threaded, and in lengths up to 1". I try to get the pre-threaded 6-32 ones, drill out my dowel to accept them and CA the threaded inserts in place. That's it!!! The nylon captures the 6-32 bolt securely, will not vibrate loose, and is easily removable for finishing/maintenance. Michael McEvilley.
Balsa Weight Chart
Building light is tough enough if you know the weight of the materials you are using. If you don't know what's light and what's not, then you don't have a chance. Maybe this chart will help.
| Dimension | 4 # per cubic ft (Contest Grade) |
6 # | 8 # | |||
| Ounces | Grams | Ounces | Grams | Ounces | Grams | |
| 1/16 x 3 x 36 | 0.250 | 7.1 | 0.375 | 10.6 | 0.500 | 14.2 |
| 1/16 x 4 x 36 | 0.333 | 9.4 | 0.500 | 14.2 | 0.666 | 18.9 |
| 3/32 x 3 x 36 | 0.375 | 10.6 | 0.563 | 15.9 | 0.750 | 21.3 |
| 3/32 x 4 x 36 | 0.500 | 14.2 | 0.750 | 21.3 | 1.000 | 28.3 |
| 1/8 x 3 x 36 | 0.500 | 14.2 | 0.750 | 21.3 | 1.000 | 28.3 |
| 1/8 x 4 x 36 | 0.667 | 18.9 | 1.000 | 28.3 | 1.333 | 37.8 |
| 1/4 x 1/4 x 36 | 0.083 | 2.4 | 0.125 | 3.5 | 0.166 | 4.7 |
| 1/4 x 1/2 x 36 | 0.167 | 4.7 | 0.251 | 7.1 | 0.334 | 9.5 |
| 1/4 x 3 x 36 | 1.000 | 28.3 | 1.500 | 42.5 | 2.000 | 56.7 |
| 1/4 x 4 x 36 | 1.333 | 37.8 | 2.000 | 56.7 | 2.666 | 75.6 |
| 3/8 x 3 x 36 | 1.5 | 42.5 | 2.25 | 63.8 | 3.0 | 85 |
| 3/8 x 4 x 36 | 2.0 | 56.7 | 3.0 | 85 | 4.0 | 113.4 |
| 1/2 x 3 x 36 | 2.0 | 56.7 | 3.0 | 85 | 4.0 | 113.4 |
| 1/2 x 4 x 36 | 2.67 | 75.7 | 4.0 | 113.4 | 5.33 | 151.1 |
Flying Stuff 
Back to Top of Page
| No Coach - Bob Pastorello |
For those who don't have a coach but recognize they have geometry problems
to correct. On plain white typing paper, draw ACCURATE shapes of the maneuvers
you're having problems with. Use as much of the sheet of paper as possible.
Make the lines properly-proportioned, angles correct, radiuses round, etc.
Then, hold those shapes in front of you, at arm's length, and use them to visualize the
geometric appearance of the maneuver. This may sound kind of hokey, but it WILL make
a difference. The arm's length visualization is pretty important. Somehow this
gives vertical placement perspective and helps.
General Thoughts - Mike Harrison
-- I've installed the Jaico switch and I really am much more comfortable with my airplane. Of course the regulator is great; it benefits in a number of ways-not only by creating consistency in servo speed and performance, but also because the Futaba 9402 servo doesn't like more than 5+ volts. I run a 6 volt 800 amp pack. I really like this total airborne battery-regulator-servo system.
-- Permit me to spin my views of the subject of aircraft weight briefly and then expand on some of those points. First, Ron Chidgey taught me that you think of weight reduction in terms of percentages and not ounces. Let me give you an example. Suppose you install a tailwheel that weighs 1.25 oz, another company makes an equivalent tailwheel that weighs 1 oz. The 0.25 oz is literally insignificant, but the 20% reduction in weight is very significant. Every item must be scrutinized in this manner, not so much by weight but by percentage of weight.
-- One other issue,performance is based on a number of factors. One very important factor is CONSISTENCY. Very important to consistency is to Eliminate VARIABLES. That means your aircraft must perform the same every time-every time. That means the aircraft must be consistent. To be consistent it must be RIGID. To be rigid it must be properly constructed. The point of all this is it is relatively easy to build very light aircraft, but the key is to build light quality rigid aircraft. That is the challenge. I am sure I can build my airplane much lighter but I add necessary weight through construction to ensure rigidity and a quality structure.
-- Don't use butrate dope as a sealer on wing panels before glassing. The dope will outgas over the life of the airplane and may cause blisters on a hot day.
This discussion came from the web site nscra-list@eskimo.com (To subscribe to the list send an email message to: nsrca-list-request@eskimo.com and in the subject line of the message put: subscribe).
![]() How does a
flyer go about determining that he needs to upgrade his servos? How do you
distinguish between an airplane design problem, a "dumb thumbs" problem, and a
poor servo problem? By poor servo I mean in the performance sense. Assume for, discussion,
that everything in the plane is functioning normally and that it is as well trimmed as
possible. Dave
How does a
flyer go about determining that he needs to upgrade his servos? How do you
distinguish between an airplane design problem, a "dumb thumbs" problem, and a
poor servo problem? By poor servo I mean in the performance sense. Assume for, discussion,
that everything in the plane is functioning normally and that it is as well trimmed as
possible. Dave
![]() Here are some things that
I look at, especially when flying someone elses plane and they ask for recommendations.
Here are some things that
I look at, especially when flying someone elses plane and they ask for recommendations.
Ailerons: How well do they center. If 1 doesn't center consistently, aileron trim will be effected.
Elevator: Is it smooth throughout the travel. This van be told through a series of 1/4 loops and full loops to see some effect.
Rudder: In knife edge flight, how effective is the rudder? Lower torque servo's will exhibit a condition called blow back, where the force against the rudder is more than the servo can handle. Knife edge loops are a prime example. Also, if they don't center well, major trim problems can develop. For snaps, I like a fast servo. I prefer that the rudder servo be the fastest of all the servo's. Ailerons could be slowest, if I had to choose where to put them.
Another test is just time.... How long before the pots get dirty or they jitter around center. For example, I use 9202's alot, for ailerons on the large IMAC planes, usually 4 of them, and elevator on my pattern planes. 9202's are just abit noisy of a servo, but very reliable, and very inexpensive, about $50 or so.
I went the Hitec route years ago. Not that they are a bad servo, I find coreless servo's are to my liking and quality.
The old saying goes, use the best you can afford. Evan Chapkis
![]() Dave, one method I
recommend is to make the decision that your servos are not adequate when YOU can sense the
frustration of poor centering, trim wander, asymmetric travel, etc. To go buy servos
BEFORE you can notice their benefit means you need more stick time. The reason I suggest
this method, is the DEFINITE improvement in your flying when YOU decide the change is
warranted....remember, it's your flights..... Bob Pastorello
Dave, one method I
recommend is to make the decision that your servos are not adequate when YOU can sense the
frustration of poor centering, trim wander, asymmetric travel, etc. To go buy servos
BEFORE you can notice their benefit means you need more stick time. The reason I suggest
this method, is the DEFINITE improvement in your flying when YOU decide the change is
warranted....remember, it's your flights..... Bob Pastorello
This discussion came from the web site nscra-list@eskimo.com (To subscribe to the list send an email message to: nsrca-list-request@eskimo.com and in the subject line of the message put: subscribe).
![]() What are the pros
and the cons of PCM vs FM. I just got through reading the article in Model Airplane News,
where the author doesn't believe there is any great help in Fail Safe, or PCM. Even the
PCM proponents admit that FM has better resolution, etc. OK, what do you all
think. Is PCM needed, or will FM be just fine in local pattern events
What are the pros
and the cons of PCM vs FM. I just got through reading the article in Model Airplane News,
where the author doesn't believe there is any great help in Fail Safe, or PCM. Even the
PCM proponents admit that FM has better resolution, etc. OK, what do you all
think. Is PCM needed, or will FM be just fine in local pattern events
![]() I used to fly a
9VAP on PPM (FM) and the borrowed a pattern plane using my tx on PCM. The difference was
day and night. Fail safe is not an issue, but if my plane ever goes into failsafe mode, my
retracts drop, that lets me know I've gone into failsafe.
I used to fly a
9VAP on PPM (FM) and the borrowed a pattern plane using my tx on PCM. The difference was
day and night. Fail safe is not an issue, but if my plane ever goes into failsafe mode, my
retracts drop, that lets me know I've gone into failsafe.
PCM has better signal rejection, and if you do get hit and loose control, the plane will lock you out, and not go wild all over the sky like FM will. I have seen this happen 3 years ago at a pattern meet. On the last flight my buddies Meridian went wild after take off, and it was the longest 45 seconds until it finally went in, and it was all over the place.
I only use PCM, even in my test airplane. Evan
![]() I think that most
opinions on PCM vs. PPM is based upon past experience, if You once have had problems with
PCM You tend to hate it. Don't listen to the Heli-guys, PCM in a copter seems to lead
directly to disaster, not comparable environment to a pattern plane.
I think that most
opinions on PCM vs. PPM is based upon past experience, if You once have had problems with
PCM You tend to hate it. Don't listen to the Heli-guys, PCM in a copter seems to lead
directly to disaster, not comparable environment to a pattern plane.
-Regarding resolution, if the computer in the transmitter is used correctly (not ATV'd to 10% !!) the 1024 steps available on new radios, should be plenty good. Ref JR super servos, has lower angle span for a certain amount of stick usage, compared to other, because you should increase ATV to MAX to fully take advantage of the radios potential resolution.
-Failsafe... well probably wont do much good on a F3A plane.
-Increased noise immunity on PCM is good, what is bad is that even if we are close to loosing control (due to noise), we wont notice it. I would like to have a possibility to hook something into the receiver after a flight, telling me the percentage of garbled messages (hold-situations), it would calm me a lot (or maybe scare me ??)
If using JR super servos, a PPM receiver with RF-noise in air, would lead to jiggling of servos, and a dangerously high power consumption. Meaning : potential crash after a few flights due to low battery (done it !)
Conclusion, flip a coin, you will be happy with both !
Ola Fremming, Norway
![]() Both the PCM and FM
receive FM signals from the transmitter, so they are both FM radios. The difference comes
in with how the information that goes to the servos is decoded. A benefit of PCM is that
you can never get any erroneous servo movements, however, the speed with which the signal
is decoded and sent to the servos is very slightly delayed due to having to be processed
in the receiver's decoder. To get right to your specific question, an FM set will work
just fine for what you want, and though I use PCM, I would not hesitate to fly am FM
system. SamTurner
Both the PCM and FM
receive FM signals from the transmitter, so they are both FM radios. The difference comes
in with how the information that goes to the servos is decoded. A benefit of PCM is that
you can never get any erroneous servo movements, however, the speed with which the signal
is decoded and sent to the servos is very slightly delayed due to having to be processed
in the receiver's decoder. To get right to your specific question, an FM set will work
just fine for what you want, and though I use PCM, I would not hesitate to fly am FM
system. SamTurner
![]() FM is generally
"stepless," so it does have _potentially_ greater resolution and generally
better speed due to no decoding needed. BUT the control over that resolution is much
better with PCM. And frankly EITHER system can have the control system resolution, torque
and speed seriously compromised by misuse of the programs and poor hookups.
FM is generally
"stepless," so it does have _potentially_ greater resolution and generally
better speed due to no decoding needed. BUT the control over that resolution is much
better with PCM. And frankly EITHER system can have the control system resolution, torque
and speed seriously compromised by misuse of the programs and poor hookups.
PCM, which is also broadcast on an FM carrier, has more resolution than you need and plenty of speed also (modern systems that is - 1024 resolution and very fast. Early systems were not as good and some still think of PCM as slow and chunky, which is no longer the case). The advantage in my opinion (and I ONLY use PCM) is the way they react to interference. Either will probably hit the ground if some dweeb on your channel turns on and stays on while you're flying. But PCM will "hold" thru the vast majority of momentary hits (most common type of interference) and you'll never know they happened. FM will happily respnond to any signal on channel, whether from your TX or some (any) other source.
Also, you can set a failsafe in PCM to - for instance - put wheels up and chop throttle if signal is lost. (Unlike Evan I like to have the gear retracted for off-field landings, but that's strictly a personal preference.)
If you use Futaba, (I don't) the best buy is the 8UAP. Not only is it PCM but it comes with much better servos, which actually make up most of the difference in price copmpared to the FM version. And the radio has about 95% of the features you'll ever actually want to use at about 35%-40% of the cost as compared to the 9ZAW. Eric Hawkinson
![]() The biggest
difference between PCM and FM is that FM allows you to crash your airplane yourself, while
PCM will sometimes do it for you. If local flying is all you're going to do, go FM and
don't sweat it. Any interference that lasts long enough to make your airplane crash in FM
will probably last long enough to make it crash in PCM as well. Fail safe can keep your
airplane in the air long enough for you to possibly regain control, so long as you don't
run out of fuel. If your fail safe isn't set up properly, however it can be worse than not
having it at all, re: Gary Shaw's safety column in Model Aviation and the Sunday Fun
column in RCM. Michael White
The biggest
difference between PCM and FM is that FM allows you to crash your airplane yourself, while
PCM will sometimes do it for you. If local flying is all you're going to do, go FM and
don't sweat it. Any interference that lasts long enough to make your airplane crash in FM
will probably last long enough to make it crash in PCM as well. Fail safe can keep your
airplane in the air long enough for you to possibly regain control, so long as you don't
run out of fuel. If your fail safe isn't set up properly, however it can be worse than not
having it at all, re: Gary Shaw's safety column in Model Aviation and the Sunday Fun
column in RCM. Michael White
Here's a method of getting the servo travel just right on your retracts.
![]() This is a fool
proof method and works for any type retract not just the Supras. Take the Supras and
measure the length of travel the control arm makes from fully retracted to fully extended.
Usually about an inch and 1/8. Now, just measure the same distance on the round
wheel (usually the second ring from the outside) and drill two opposite side holes.
You've got it. Don Ramsey (Sam says the same thing below but says it a little
better)
This is a fool
proof method and works for any type retract not just the Supras. Take the Supras and
measure the length of travel the control arm makes from fully retracted to fully extended.
Usually about an inch and 1/8. Now, just measure the same distance on the round
wheel (usually the second ring from the outside) and drill two opposite side holes.
You've got it. Don Ramsey (Sam says the same thing below but says it a little
better)
![]() If you DO want to
know EXACTLY how much throw to allow for with the servo output arms, there is
a very simple method to determine the throw you need. Put one retract so it sits flat on a
piece of paper. With the control arm pushed in fully, mark on the paper at the
position of the hole in the control arm. Next, extend the control arm
fully...again, mark the position of the hole on the paper. This gives the
total throw required. Divide the distance in half, and the result is the
distance of the desired hole in the servo arm from the center. Use just
slightly less than this measurement or put a slight bend in the clevis rod going to the
retract to allow for any error in your measurement. Always connect the
clevis rod to the retract with a screw-type clevis which connects directly to the control
arm....this lets you compensate for any error you incur while attaching to the servo.
Sam Turner
If you DO want to
know EXACTLY how much throw to allow for with the servo output arms, there is
a very simple method to determine the throw you need. Put one retract so it sits flat on a
piece of paper. With the control arm pushed in fully, mark on the paper at the
position of the hole in the control arm. Next, extend the control arm
fully...again, mark the position of the hole on the paper. This gives the
total throw required. Divide the distance in half, and the result is the
distance of the desired hole in the servo arm from the center. Use just
slightly less than this measurement or put a slight bend in the clevis rod going to the
retract to allow for any error in your measurement. Always connect the
clevis rod to the retract with a screw-type clevis which connects directly to the control
arm....this lets you compensate for any error you incur while attaching to the servo.
Sam Turner
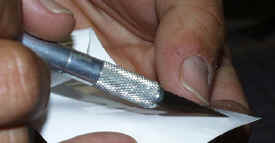
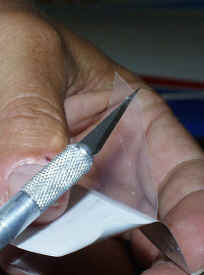
Ever have a problem getting the backing off a piece of Monokote you just cut? Well, there's a simple way to get it done. Just take your exacto with a #11 blade, use the tip of the knife and on the backing side of the covering, slide the knife tip through the backing at an edge and pull it up. Use a sharp angle on the blade, pierce the backing and lift it.
|
|
|
|
|
Why Use a Battery Checker - Bob Pastorello
New airplane...first flights...things are going well...UNTIL the pre-flight use of the ESV, which reveals a 5 cell battery pack reading 4.96....Hmm...so we fast charge, measures okay, off we go....Flights are fine. End of day....checking battery....reads 4.5 (remember this is a 5 cell pack !!)
At home, I find the battery pack has a shorted cell...reads 0.00 volts ...other cells fine. What's interesting about this???
Part of building the new plane was cycling the 1200 mah, 5 cell pack. Things were great. Charger fine, peaked and measured before flights today. LITERALLY, the cell died BETWEEN flights....
Why do I tell this? Had I been using a 4 cell pack, and one shorted, I would now be the proud owner of a brand new crash.
The lesson refreshed for me here...ALWAYS use the ESV. Pay attention to it. Make NO assumptions about packs that "checked fine yesterday"....had I done that, my NEW, and GREAT flying Hanson EMC2 would be a trash bag filler. And I'll likely NEVER run a 4 cell pack...remembering that NO receivers will work at 3.5 (which is what I WOULD have had with a shorted cell in a 4 cell pack, instead of the 5....). Instead, I'm off to the field tomorrow, with spare pack in hand....Enjoy your flying, folks. It sure is easy for Murphy to nail us all....
![]() Here is something to chew
on, I have always used monokote and sealed the surfaces. However, using CA hinges and
attaching with no gap present, is it really necessary? The only real feature I see with a
tight fit anyway is extra security if a hinge should fail...Michael Marohnic
Here is something to chew
on, I have always used monokote and sealed the surfaces. However, using CA hinges and
attaching with no gap present, is it really necessary? The only real feature I see with a
tight fit anyway is extra security if a hinge should fail...Michael Marohnic
![]() Seal them anyway. Even
gaps that appear nearly perfect, are not. When G-loaded, slight differences in the gaps
will likely show up, causing a slight roll while pulling or pushing. I find it easier to
seal the gaps, particularly aileron, and know that is done. Then concentrate on other
reasons for unwanted roll such as rudder and thrust trim. Ron Lockhart.
Seal them anyway. Even
gaps that appear nearly perfect, are not. When G-loaded, slight differences in the gaps
will likely show up, causing a slight roll while pulling or pushing. I find it easier to
seal the gaps, particularly aileron, and know that is done. Then concentrate on other
reasons for unwanted roll such as rudder and thrust trim. Ron Lockhart.
![]() Here is another choice
--I use pinned Klett std and pull the mating surfaces togather with masking tape whilst
they are drying (epoxy)--On the models I am presently using, I find no need to fuss with
the Monokote seal --Years ago I found that it really helped on some -NOT ALL models
–Dick Hanson
Here is another choice
--I use pinned Klett std and pull the mating surfaces togather with masking tape whilst
they are drying (epoxy)--On the models I am presently using, I find no need to fuss with
the Monokote seal --Years ago I found that it really helped on some -NOT ALL models
–Dick Hanson
![]() I agree with Ron, I too
have been using the EZ type hinges but continue to seal the aileron and elevator gaps.
Although I use Monokote on the flying surfaces I have been using clear Ultracote to seal
the gaps. Keeps my trim scheme intact and Ultracotes lower tack temperate ensures my
Monokote job is not disturbed. I find with low temps I can peel the Ultracote off the
Monokote should the clear Ultracote develope a split making replacement a snap. I used to
use the clear Dave Brown sealing material and found it stuck well to painted surfaces but
I had trouble keeping it down on Monokote. Ed Miller.
I agree with Ron, I too
have been using the EZ type hinges but continue to seal the aileron and elevator gaps.
Although I use Monokote on the flying surfaces I have been using clear Ultracote to seal
the gaps. Keeps my trim scheme intact and Ultracotes lower tack temperate ensures my
Monokote job is not disturbed. I find with low temps I can peel the Ultracote off the
Monokote should the clear Ultracote develope a split making replacement a snap. I used to
use the clear Dave Brown sealing material and found it stuck well to painted surfaces but
I had trouble keeping it down on Monokote. Ed Miller.
![]() I use clear silicon to
seal the gaps. This is the stuff you buy in a hardware store for sealing seams around
bathtubs. I make a 'trowel' out of 3/16 balsa that matches the angle of the bevel between
the aileron and the wing trailing edge when the aileron is fully deflected. Be sure to
release the pushrod from the control horn. Working from one end of the aileron from the
bottom of the wing, work in as small a bead of silicon as possible into the gap. The less
the better to eliminate any binding. When you are finished, check the top side of the wing
to make sure you don't have lumps in the top seam. If it is uneven, simply use your
'trowel' to eliminate the uneveness. When you are finished, reattach the pushrod and set
the aileron in the neutral position for drying overnight. You now have a sealed gap that
is practically invisible with no binding. An added benefit is that the aileron, or
elevator or rudder, will always want to return to neutral. I have been using this
technique for years without any problems. Rich Fletcher
I use clear silicon to
seal the gaps. This is the stuff you buy in a hardware store for sealing seams around
bathtubs. I make a 'trowel' out of 3/16 balsa that matches the angle of the bevel between
the aileron and the wing trailing edge when the aileron is fully deflected. Be sure to
release the pushrod from the control horn. Working from one end of the aileron from the
bottom of the wing, work in as small a bead of silicon as possible into the gap. The less
the better to eliminate any binding. When you are finished, check the top side of the wing
to make sure you don't have lumps in the top seam. If it is uneven, simply use your
'trowel' to eliminate the uneveness. When you are finished, reattach the pushrod and set
the aileron in the neutral position for drying overnight. You now have a sealed gap that
is practically invisible with no binding. An added benefit is that the aileron, or
elevator or rudder, will always want to return to neutral. I have been using this
technique for years without any problems. Rich Fletcher
![]() I did a bit in the
K-Factor a few years back. Still works great and still using the same technique as
follows:
I did a bit in the
K-Factor a few years back. Still works great and still using the same technique as
follows:
The end result is much lighter because the hairspray limits the penetration of the epoxy to the wood. You'll see what I mean the first time you try it. If you're worried about the strength, don't be. Von Linsowe's TOC 202 was done this way and probably had more stress put on the structure than most of us are capable of short of crashing! Verne Koester
![]() I do the same sorta
process but use BALSARITE. This cuts the amount of epoxy I used per sheet by about 40-50
percent. I also think I get a better bond because the glue ends up between the foam and
wood, not soaked in to the wood. One point I would add is to sand the foam itself with 240
grit, then vacuum. Gene Maurice NSRCA 877 (Editor's note: insure the balsarite
is completely dry before putting on or near the foam because the solvents will melt your
cores).
I do the same sorta
process but use BALSARITE. This cuts the amount of epoxy I used per sheet by about 40-50
percent. I also think I get a better bond because the glue ends up between the foam and
wood, not soaked in to the wood. One point I would add is to sand the foam itself with 240
grit, then vacuum. Gene Maurice NSRCA 877 (Editor's note: insure the balsarite
is completely dry before putting on or near the foam because the solvents will melt your
cores).
![]() The Balsarite
method works terrific and as a real bonus, makes the wood fibers of the sheeting
significantly stronger than plain / bare / untreated wood -- not to mention the reduced
amount of epoxy required to properly sheet the core. Be sure to let the Balsarite dry
completely (20 - 30 min.) before initiating your sheeting procedures -- it contains
solvents that must flash off. Michael Onstott
The Balsarite
method works terrific and as a real bonus, makes the wood fibers of the sheeting
significantly stronger than plain / bare / untreated wood -- not to mention the reduced
amount of epoxy required to properly sheet the core. Be sure to let the Balsarite dry
completely (20 - 30 min.) before initiating your sheeting procedures -- it contains
solvents that must flash off. Michael Onstott
I Cut the servo box in the foam before I sheet the wings. With the core lying in the top shuck I reach threw the servo cut out and mark the exit location on the shuck as well as the entrance location at the root. After I sheet the wings I lay the top shuck on the table. I use a simple jig to guide an aluminum arrow shaft with a standard point. The jig has guides that are adjustable for height at both ends. Align the shuck with the arrow about 1/8 from the shuck on your mark and tape the shuck to the table. Put the wing in the shuck with a little weight on it. Heat the arrow tip with a torch and plug it in. The jig is Simple to build (maybe fifteen minutes). I took a piece of 1/2 " hardwood 8" long and drilled two pins into it so it could be removed and installed on the table. Then I used four pieces of lite ply for the guides one set with oblong holes mounted on the ends of the 1/2" hardwood and the other drilled for the arrow screwed on with oblong screw holes to allow adjustment. It never misses and is handy especially if you have a bunch of the same wings to do. Harold Collins
I have a router fixture for my Dremel tool which really makes this process easy. First I use a 1/8" bit a rout a channel 1/4" deep from the servo bay to the root. This is followed by routing a square "tube" into the foam using a 3/8" x 5/8" Dremel grinding stone, letting the shank travel trough the channel. Takes about two minutes, NO chance of getting out of line, and results in a very smooth interior surface.
Gene Maurice AMA 3408 NSRCA 877
The best way I have found is neat and clean. Get a Weller soldering gun and make a "loop" that is about 1/2" in diameter with the wire extending straight up at the same place. These wires attach to the soldering gun. The wires going up cannot touch or the heat will build there instead of the entire copper wire. Then attach a couple pieces of wood to the loop as a stop so your depth is the same along the length of the cut. The key is to make the extending wires in the same plane so that when you cut the holes they track in the slot left. Now tape a straight edge to the wing surface and use it as a guide. The circle loop will leave a great hole for servo wires and requires no other clean up. Just take your time and make the bend the loop around a dowel and then you will have a round hole. Looking at the loop flat it should look like a wire circle with a wire sticking out he top. (i.e. Thermometer shape) Looking at the edge it should have a slight offset as the wire "spirals" to get the offset. The wood pieces are screwed together to clamp the wires in place and provide a stop. Works very very well...This will leave a small as in 1/8" trench in the top or bottom of the wing but will not be a factor in sheeting or strength.
Now if the wings are sheeted then use a brass tube, works good in a cordless hand drill.
Later Troy Newman
Those who have a variable power supply, can make a small thin wire cutter --shaped like a tiny light bulb--with the neck of the cutter twisted 90 degrees - this will drop thru the foam surface and cut a round hole --the size and shape of the "bulb" portion--leaving a tiny slit in the wing surface --which causes no strength problem. when the cut is completed - a nice round rod of foam can be pulled from the core- -the resultant surface is smooth and firm-- allowing the servo wires to easily slide thru- -Sorry -no high tech stuff needed . Dick Hanson
August 2014: OK fellas: I have found the answer to those who say it is too expensive to enter pattern!!!!!!!!!!!!!!!!!
I just flew the e-flight Splendor and it was great. At $199 for a model with motor, ESC, all the servos and receiver, its hard to beat. The setup was the stock plane with all stock serovs, a Futaba receiver, and 4000mah 6S battery.
We changed the receiver for a Futaba
one, set the aileron throw to 9 degrees the elevator to 10 and a lot of rudder.
For normal pattern flying the ailerons were a little hot so on second flight
they were reduced somewhat. Third flight, I flew the new Advanced sequence
using about 60% of a 4000mah 6S battery. There was little wind, but in
that condition, the model could be very competitive in Advanced. Since
there was not much wind I’m not sure how it would do in the wind but it is a
great plane for not much money.
Don Ramsey
Oct 2008: I highly recommend the Vanquish. Extreme Flight RC sells this fantastic small, fully capable pattern plane. Also the wings are removable and RC Aerobatics.com has some very nice small wing bags that work well for the Vanquish. Regards, Bryan Kenedy
- All my Bolly pipes are 7/8".
The Bolly mufflers (480R and 590R) have a 3/4" flange for about an inch and
then a 7/8 flange beyond
- Macs headers are 7/8"
- ES pipes I've seen are 3/4 for the 2-stroke
pipes. 5/8" for the 4 stroke pipes
- Karl Mueller headers are 3/4"
From Lance Van Nostrand
Pattern Home Page | Rudder Control | Max Points in Novice | Contests/Results | Rebuild Fiberglass Fuse | Glasses | Fuel Facts | Links
RC