Effective Lighting
Obviously, good lighting is critical if you expect good video. Poor lighting will result in the loss of detail and, in extreme cases, causes graininess of the finished video. Most viewers will focus on the lighting of your subject's face. If you make sure your key subject's face is well-lit, then you will succeed. The fluorescent lighting in most classrooms may be adequate; however, even in a brightly lit room there may be problem areas that require avoidance or correction with external lighting. Make sure the lighting is not all coming from the same direction or the subject may appear to be flat, without depth. This is especially not flattering for the subject. Adequate lighting in a room with good overhead lighting can be had by paying attention to the positioning of your camera and subjects.
3-Point Lighting
If you are capturing an interview or close up of an individual, a more elaborate lighting system can help. Just lighting the human face can look rather flat. Adding depth to the shot can be accomplished by differentiated lighting on the two sides of the face and on the background behind the subject.
The Key Light
The key light is the primary source of illumination in a scene. It may be the sun, light from a window, or a spot light. The key light in a studio is often located at a 45 degree angle from the camera/subject horizontal line and also at a 45 degree angle vertically above the same line. The key light is usually the brightest of the light sources. It may have a translucent cover to soften the light.
The Fill Light
The fill light is selected to fill in the shadows caused by the key light The goal is to reduce the contrast ratio. The fill light is usually 90 degrees to the side of a line between the key light and subject.
The Backlight
The backlight comes from behind the subject. It helps separate the subject from the background. The back light may be on the wall or often illuminates the back of a person's head. If you plan to do a great deal of video projects that involve interviews or close ups of speakers facing the camera, you may want to establish a simple studio with 3 point lighting.
Shooting Outside
Shooting medium to close shots of people in full sunlight can be a challenge. The harshness of the light can leave deep shadows on the face or leave faces too dark as the camcorder's auto focus responds to bright sunshine. It is best to shoot in diffused sunlight. This can be accomplished by looking for shade or by shooting in the early morning, late afternoon, or on a cloudy day. Professionals actually use a cloth diffuser between the sun an their subjects.
Using a Reflector
Whether you are inside or outside, you may want to keep a piece of white foam core available to reflect light on to your subject. If you only have one key light (the sun, a window) then the using a reflector on the opposite side of you subject can create a fill light removing objectionable shadows.
Lighting Extremes
Pay attention to the overall differences in lighting in the view finder. Remember your auto exposure, for most cameras, looks at the average brightness of the whole field of view to determine how much light it captures. If there are lots of white or bright lights, then your subject's face may be under exposed.
More lighting examples:
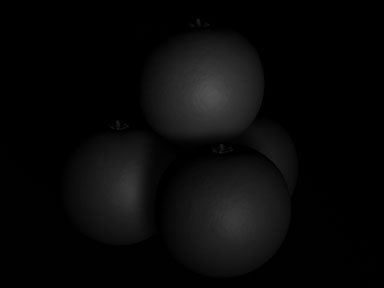
THE KEY LIGHT
Credits to Andrew Whitehurst
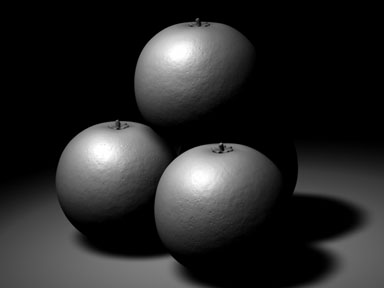 By placing the key light above and to the left we can see the volume of the oranges (i.e. that they're spherical). We can also see that they are on the floor by the shadows cast and that they are stacked on top of each other. However the image is lacking detail in the shadow regions and is a bit brutal. In order to fix this we need to add another light to the right of the oranges to add some illumination to those darkened areas. This light is called the FILL LIGHT. Let's look at what this light contributes to the scene.
THE FILL LIGHT
 The job of the fill light is to illuminate those areas of the image which are in shadow when the key light is placed. It should be pretty obvious therefore that the fill light is placed after and in relation to the key light. As the job of the fill is only to allow us to see a little more detail it should not be as intense as the key light. Look at this example; the key light is about 2-3 times brighter than the fill. Let's take a look at how the key and fill light work together.
KEY AND FILL
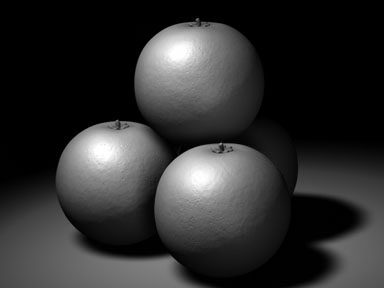 The image now looks a lot better than it did with just a key light. The image has more depth and detail. It is neither too dark, nor too washed out. However there is something more we can add. The right side of the oranges are getting a little lost against the background. In order to counteract this we can add a RIM LIGHT.
THE RIM LIGHT
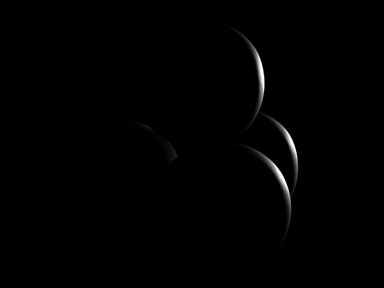 The rim light is placed behind the objects being illuminated and is angled so that the light glances off the surface of the object at the narrowest angle. The intensity of this light is often quite high, often brighter than the key. Due to its intensity and placement it creates a line of bright light around the object and in doing so lifts the object away from the background. The rim light is principally used to ensure that a dark object does not blend in with a dark background. OK now the lighting is complete let's examine the finished result.
THE FINISHED RENDER
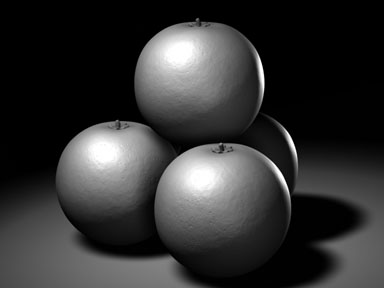 The rim light has lifted the oranges away from the background, the orange at the bottom right was in danger of disappearing into the background but is much better modelled now. The image still has contrast and a good range of tones from black through to white. The floor shadows and the shadowing of one orange onto another are still there showing each object's relationship to the next, but you can see detail even in the shadow areas on the fruit. All that's left to do is a little bit of tweaking in post.
THE FINISHED IMAGE
 By adding a subtle glow to the strongest high-lights (those created by the rim light) and by softening the image to limit that super-crisp "CG look" the image can be improved a little more. You can tweak an image indefinitely like this by adding noise and so on but I've decided to leave it like this.